Creating the right restaurant floor plan can make or break your business.
As a business owner, you must balance design, cost, and experience to fit your space and goals.
In this guide, you’ll find tips on measuring your space, deciding on key zones, and setting seating goals.
Sketch your layout, optimize traffic flow, and use smart budgeting tactics.
We’ll also explore software solutions and advanced tips to make your restaurant stand out in 2024.
Lower your delivery costs by 23%
How we reduce costs:
- No delivery vehicle expenses
- Optimized local routes
- Pay-per-delivery model
- Average 23% delivery cost reduction
Step 1: Understand Your Space and Requirements
-
Measure spaces precisely to prevent layout errors.
-
Define clear zones for operational efficiency.
-
Plan seating to fit your capacity and maximize comfort.
Assess the Physical Space
Before you start drawing a floor plan, you have to know your space well. You can start by measuring the room’s dimensions. You can include all walls, windows, and doors in your measurements. Even an inch off can throw off your whole plan later. Interested in preparing for a restaurant’s preliminary opening? Discover how to effectively organize a soft opening for your restaurant.
Measure Dimensions
Grab a tape measure and write down the length and width of each room. You shouldn’t assume the room is a perfect rectangle unless it is. Note if there are alcoves or corners. These measurements must be accurate. You’ll need them when drawing your above floor plan to scale.
Identify Fixed Elements
Every restaurant has fixed elements. Columns, immovable fixtures, or existing utilities need attention. Noting these obstacles beforehand ensures they won’t disrupt your plans later. You can make a separate list of these elements. Knowing their locations helps in navigating layout adjustments.
Define Main Functionality Areas
You should clear zones within your restaurant’s physical space to define its operations. To start, list the main functional zones needed for your operation: kitchen, dining, restrooms, and storage. Each zone must have a purpose and a logical place in your layout. Learn how to initiate a restaurant venture, including defining operational zones within your establishment, developing a comprehensive business strategy, and acquiring necessary funds and an ideal site.
Decide on Zones
Allocate areas based on function. Kitchens are the heart of a restaurant, so plan for enough space for staff to work comfortably. Similarly, restrooms should be easily accessible from both kitchen and dining areas. Storage needs proximity to the kitchen and fine dining side, reducing time spent moving supplies.
Consider Operational Flow
You should think about workflow and imagine how people, both staff and patrons, will move within the restaurant space. A smooth flow minimizes operational hiccups, reducing service delays. Make sure pathways between zones like kitchen to dining are direct and unobstructed. This planning stage can save time and enhance efficiency.
Set Capacity and Seating Goals
Seating drives revenue. More seats and ample space generally mean more income, but squeezing too many can hurt comfort. Balance your seating goals with your space’s reality.
Calculate Seat
You can start by running numbers. How many patrons do you want to serve at peak? It is better to use your room dimensions to see if your capacity goals fit the bathroom layout. Allow adequate space between tables, following safety and comfort guidelines. Learn the vital actions necessary to initiate a restaurant business, including developing a thorough business plan, obtaining necessary finances, and choosing an ideal premises.
Plan Seating Styles
You can choose the seating types that suit your theme and target audience. Options include booths for privacy, tables for flexibility, and bar seating for quick service. Each style has distinct space requirements and unique advantages. Discover the steps to franchising a restaurant and make your dining establishment a successful franchise with tailored seating options to enhance customer experience.
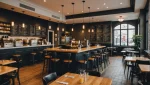
Drawing a Restaurant Floor Plan
To draw a floor plan, use the measurements and details gathered in the previous steps. The easiest way is to start with a sketch on paper, marking the zones and fixed elements. Once you have a basic idea, use free software like SmartDraw or Lucidchart to digitize your sketch for easier adjustments and a professional look. Both these tools allow for drag-and-drop features and have accessibility options for ADA compliance planning.
What Layout Works Best?
The layout choice depends on your restaurant’s concept and space constraints. Common formats include grid-style for large, efficient settings or a more open plan for a casual, inviting feel. Each restaurant layout comes with its own set of advantages catered to different styles of service and dining experiences.
Step 2: Design Your Restaurant Layout
Sketch an Initial Layout
Getting started with your restaurant layout starts with a sketch. You can use a plain sheet of paper. Begin by plotting the basic zones. You should think about areas like the kitchen, dining room, restrooms, and entrance. It is better to use rectangles or circles to represent each section and make sure these zones match your understanding of the space from your initial assessment.
Next, you should think about furniture and equipment and mark them on your layout where they might go. Tables, chairs, the bar, or any fixed equipment should be part of your sketch. This is a rough draft, so don’t worry about precision yet. It’s all about visualizing how the space might work.
Focus on Traffic Flow
Traffic flow is key in any restaurant design. Patrons and staff should both have clear paths to move around. Always prioritize straightforward routes. In busy spots, like from the kitchen to the tables, ensure there’s enough room for staff to carry trays comfortably.
You should keep an eye on ADA compliance. This means that paths should allow for easy movement for people with disabilities. You can ensure doorways are wide enough and ramps are available where needed. This not only helps guests but also adds legal compliance to your design.
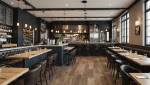
Optimize for Customer Experience
Plan for Customer Comfort and Visibility
Customer comfort and visibility are vital in a dining experience. You can start by using extra dining space and considering how customers will interact with the space. The tables should not be too close to each other. You can provide privacy while ensuring servers can access diners easily and use Stephani Robson’s insight — banquettes create a more intimate space compared to two-top tables. This can make guests stay longer.
Lighting plays a huge part in ambiance. Soft lighting works well for intimate dinner settings. In contrast, bright lighting could suit a quick-service spot. Proper acoustics can minimize noise, adding to a pleasant dining experience.
Thorough design planning as per the steps above will ensure that the restaurant industry layout works efficiently, both in terms of service and customer satisfaction. This section addresses what a restaurant floor plan should include, focusing on both the functional and experiential aspects.
Step 3: Implement Cost-effective Restaurant Layout Ideas
-
Movable, multi-purpose furniture optimizes space.
-
Budget smartly: Invest in phases and high-impact areas.
-
Update layouts without heavy expenses to enhance flow and ambiance.
Prioritize Flexibility
Every penny counts in setting up your restaurant layout, and flexible furniture is an easy win. Movable tables and chairs let you adjust your floor plan to match different needs, like parties or events. This can boost your restaurant’s efficiency without extra costs. You should look for lightweight materials but durable options that don’t compromise quality. Multi-purpose furniture is another way to save space and money. Pieces that double as storage units or can be collapsed make your space adaptable. By prioritizing flexibility, you can drastically cut costs on future re-arrangements and repairs. Plus, your dining area becomes a dynamic space. Understanding why establishments falter can offer valuable insights; explore the primary reasons restaurants struggle and learn how to steer clear of these common blunders, ensuring your restaurant remains adaptable and successful with strategic layout planning.
Movable Furniture
Movable furniture offers solutions when you need quick changes. Popular options include folding chairs and adjustable tables. These allow for rapid floor plan switches without hassle.
Multi-purpose Furniture
Multi-purpose pieces advance the cause further. You should think of benches with storage underneath or tables that can expand for bigger groups. This adaptability is invaluable and practical.
Budget Cleverly
No matter what size your restaurant is, budgeting is a cornerstone of staying cost-effective. Allocate your funds where you’ll get the most return, typically in high-impact areas like decor and strategic signage. You can consider breaking down your improvements into phases. Doing this allows you to manage expenses, curtailing overspending, and lets you prioritize what truly needs attention first. It’s much like updating your wardrobe in small steps rather than overhauling it in one go. Phased renovations also offer an ongoing opportunity for feedback, allowing for adjustments without hefty costs.
High-impact Areas
Dining decor, especially, can set the tone instantly. You can invest here because first impressions matter and consider ambiance a high-impact area that influences customer experience. Lighting and DIY decor, like local art, can add personality and cut expenses.
Phased Improvements
Phased improvements reduce financial loads. Instead of a single hefty cost, split improvements over time. This not only helps with cash flow but also provides room for testing and adapting new ideas.
You can consider utilizing outdoor spaces for expanding seating with minimal cost. Features of outdoor seating like local art or recycled materials introduce unique character while saving money. Greenery can boost mood and air quality, lifting the atmosphere with minimal investment.
Step 4: Incorporate Essential Elements of Restaurant Floor Plans
Integration of Kitchen Design
The kitchen is the restaurant’s engine. Efficient kitchen design ensures a smooth operation and impacts overall customer satisfaction.
Ergonomic Placement of Kitchen Stations
You can start with organizing the kitchen to support the workflow. It is better to identify tasks first, like food prep areas, cooking, and plating areas. You should ensure each station follows a linear sequence to reduce staff movement. You can consider positioning storage and sinks nearest to where they are used. This minimizes time spent walking back and forth.
Imagine placing your prep table directly next to the refrigerator, making it easy for chefs to grab ingredients. The stove and oven should connect to prep stations, eliminating unnecessary steps.
When placing kitchen stations, you can consider the height of the counter space and the distance between tools and countertops. Keep essential tools within arm’s reach to prevent fatigue and improve speed.
Plan Storage for High-Efficiency
Storage planning is crucial. Allocate ample storage space for raw materials and equipment. Place refrigerators and freezers to minimize exposure to ambient temperatures. Store heavier and less frequently used items lower to avoid strain. You should prioritize the most used items at eye level for quick access.
For instance, designate shelves for spices, oils, and sauces near the prep area. This setup minimizes downtime while cooking. Shelves can have clear labels to keep items organized. Uncover how maximizing your kitchen’s efficiency can boost revenue per available seat hour (RevPASH) and elevate your restaurant’s earnings.
Front-of-House Elements
Designing the front-of-house requires creating an inviting and comfortable space while ensuring seamless integration of operational elements.
Reception or Waiting Area Design
A well-designed reception or waiting area is the first impression of your restaurant. Position it near the entrance but not blocking pathways. You can provide seating that is comfortable but space-efficient. You can use visuals like artwork or a feature wall to set the mood as guests walk in.
You should think about lighting and sound. Softer lighting creates a relaxing ambiance, ideal for waiting. Background music should be low enough to not interfere with conversation. You can use plants or partitions to offer privacy and help manage crowd noise.
Addition of Point-of-Sale Systems
Adding point-of-sale systems (often called POS) must be strategic. POS stations should allow servers quick access without obstructing customer paths. Position them close to high-traffic areas such as the kitchen entrance or bar to reduce unnecessary walking time for staff.
You should ensure they have enough power outlets and reliable internet connectivity. It is better to consider integrating mobile POS devices, allowing staff to take payments at the table, and speeding up service while providing convenience for guests.
By meticulously incorporating both kitchen and front-of-house essentials, you streamline operations, enhance staff productivity, and improve customer experiences. This foundational setup will prepare you to explore more advanced planning tools in the following steps.
Step 5: Utilize Floor Plan Software for Restaurants
Software Selection
Choosing the right software is crucial. Start by reviewing programs. These tools offer user-friendly interfaces with features such as drag-and-drop functionalities, allowing you to build layouts without complex technical skills. Look for options that offer 3D visualization and 3D model showcase, as this functionality gives a better understanding of how much space is in a restaurant setting. Additionally, some software versions provide templates specifically for restaurants, which could be a significant time saver. Searching for software specific to your needs?
Key Features to Consider
-
Drag-and-Drop Functionality: Simplifies arranging elements on your digital floor plan.
-
3D Visualization: Offers a realistic preview of your space, helping in better decision-making.
-
Cost and Subscription: Review pricing models to ensure they fit within your budget.
-
Integration: You should check if it can integrate with other management tools for seamless operations.
Create a Digital Floor Plan
Once you’ve selected a software tool, the next step is digitizing your sketched plan. You can begin by inputting the basic sketch developed in earlier steps. Most software options allow you to scan and import sketches to serve as initial blueprints for digital conversion. Once imported, you can refine and adjust the layout, moving elements around using the drag-and-drop feature. This digital plan can serve as both a preliminary design to experiment with and a final version to share with stakeholders.
-
Input Sketch: Directly you should upload your hand-drawn sketch into the software.
-
Adjust and Enhance: It is better to use the software’s editing tools to tweak furniture placement, alter traffic flow paths, and refine seating arrangements based on practical or aesthetic preferences.
-
Use Virtual Previews: Make use of 3D visualization tools, which allow you to see a digital walkthrough of the space. This will help in spotting potential issues you might miss in a 2D layout.
-
Incorporate Feedback: You can share the digital floor plan with team members for feedback and use collaboration features specific to some software for real-time updates.
-
Finalize Plan: Once feedback has been considered and adjustments made, save the final version in the required formats (PDF, JPEG, etc.).
How to Create a Restaurant Floor Plan: Ready to Your Restaurant Dining Room
You’ve now got the tools to craft the perfect restaurant floor plan. From your space planning, understanding your space, and defining key areas to leveraging cost-effective design and using floor plan software, every step is crucial for operational success and customer satisfaction.
You can start by assessing your space, and then sketch your initial layout. You can use software to bring it up to date knowledge of your life digitally. You shouldn’t forget to prioritize customer experience while managing costs effectively. What’s your biggest challenge in restaurant design? When planning your restaurant, consider using free resources to guide your business strategy. Accessing useful restaurant business plan templates can streamline your planning process and keep you on track for success.