
Almost every disappointing food photo fails on light, not on the camera. The dish was good, the phone was fine, and the picture still came out flat, grey-green and unappetising, because it was taken under the ceiling fluorescents of a working kitchen at four in the afternoon.
Food photography lighting is a small subject with a big payoff. There are roughly three decisions to make: how soft the light is, which direction it comes from, and whether the colour is accurate. Get those three right and a phone photo will beat a professional camera in bad light every time. This guide covers the window-light setup that handles most dishes, the clock positions that control shape and shadow, what to buy if you have no usable window, and how to keep forty photos consistent so a whole menu shot for delivery looks like one menu rather than forty separate afternoons.
The Bottom Line
One diffused window, one white reflector card, and the light coming from the side is the complete setup for most dishes. Everything else is refinement.
Direction decides shape. Think of the light as a clock face around the plate: 9:00 for side light, 10:00 to 11:00 for side-backlight, 12:00 for backlight behind a glass or a bowl of soup.
Never mix window light with the kitchen’s overhead lights. Two colour temperatures in one frame produce a colour cast no editing will fully remove.
If you buy an LED, the spec that matters for food is CRI 95 or higher at around 5600K. A cheap panel with poor colour rendering makes fresh produce look tired.
Save 80% of delivery management time
We handle everything:
- Dedicated operations manager
- Real-time tracking dashboard
- Automated customer notifications
- Urgent issue resolution
Why window light beats your kitchen’s overhead lights
Overhead kitchen lighting is designed to let people work safely, which is the opposite of what a photograph needs. It comes from directly above, so it flattens texture and drops a hard shadow onto the plate under any rim or garnish. It is usually fluorescent or low-grade LED, which pushes greens and yellows into the food. And there is often more than one fixture, which means multiple crossing shadows.
This is also the failure that survives editing. Exposure can be lifted and contrast can be added afterwards, but a green cast baked in by a cheap fluorescent is a missing colour channel, and even the relighting tools in modern AI product photography tools are guessing at what the colour should have been rather than recovering it.
A window does the opposite. It is a single large source, it comes from the side, and on an overcast day it stays the same colour and intensity for hours. The largeness is the important part: a big source relative to the subject wraps around it and produces gentle shadows, which is what makes food look three-dimensional and edible. A small source such as a bare bulb or a phone flash produces hard-edged shadows that make the same dish look like evidence at a crime scene.
The practical rule: find the largest window in the building, put a table next to it, and never turn the ceiling lights on while you shoot. If the room is too dark with the overheads off, that is a signal to add a proper light, not to compromise with the ceiling.
Turn off every other light in the room
This is the single most-ignored piece of advice in food photography and it costs nothing. Daylight is roughly 5500K. A warm domestic bulb is around 2700K. Put both in one frame and half the plate is blue and half is orange, with no white balance setting that fixes both. One light source, one colour temperature, every time.
Soft light versus hard light in food photography
Soft light has gradual, fuzzy-edged shadows. Hard light has sharp, dark, clearly outlined ones. Neither is wrong, but soft light is right for about ninety percent of food.
Soft light flatters texture without exaggerating it. The crumb of a loaf, the glaze on a tart, the condensation on a glass: all of these read clearly under soft light and disappear into blown-out highlights or black shadow under hard light. Soft light is also forgiving: it hides the small imperfections of a dish that has been sitting under a camera for four minutes.
You make light softer by making the source bigger relative to the dish, or by putting something translucent between the light and the food. In practice that means one of three things:
-
A sheer white curtain or a shower curtain over the window. Costs nothing, instantly turns harsh direct sun into usable light.
-
A diffusion panel, which is a white translucent sheet on a frame. A 5-in-1 reflector kit includes one and costs very little.
-
Baking parchment taped over the window, which is the emergency version and works better than it has any right to.
Hard light earns its place occasionally: a dramatic shot of a cocktail with a crisp shadow, a rustic board where sharp shadows add texture. For a delivery menu it is almost always the wrong call, because hard light makes food look less approachable and the shadows survive the thumbnail crop more aggressively than the food does.
Where to put the light: side, side-back and backlight
Direction decides shape. The standard way photographers describe it is as a clock face, with the camera at 6:00 and the plate in the centre.
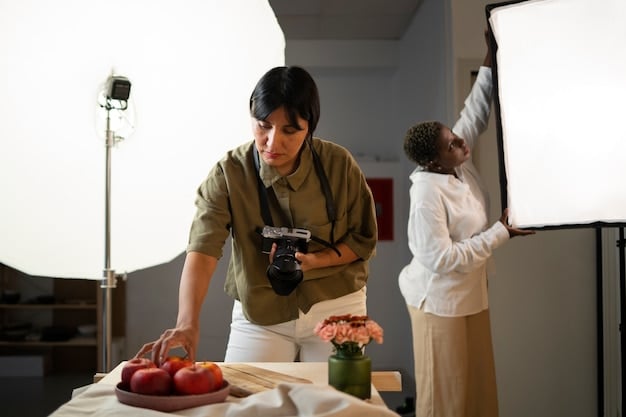
9:00, side light. The light comes from directly beside the dish. This is the workhorse. It rakes across the surface of the food, which reveals texture, and it throws a shadow to the opposite side that gives the dish volume. Put a white reflector at 3:00 to bounce light back into that shadow and control how dark it goes. Use side light for plated dishes, sandwiches, baked goods, anything where texture is the selling point.
10:00 to 11:00, side-backlight. A hybrid, and arguably the most useful single position for food. The light comes from behind and to one side, which produces rim highlights along the top edges of the food and a longer shadow coming toward the camera. It flatters almost everything and needs fewer reflectors than pure side light because some of the light is already wrapping around (ExpertPhotography, retrieved 2026-10-03).
12:00, backlight. The light is directly behind the dish, shining toward the camera, with a diffuser between the source and the table. This is the setup for anything translucent or liquid: soups, broths, drinks, glassware, anything with steam. Light passing through the subject makes it glow. You will need reflectors on both sides and in front to stop the front of the dish going black, and the camera has to be angled so the light source itself stays out of frame.
What you almost never want is 6:00, light coming from behind the camera, straight at the food. That is what a phone flash does, and it kills every shadow, which kills every sense of depth. The dish ends up looking like a photocopy of itself.
Building a natural light food photography setup in one window
Here is the full setup, which takes about ten minutes to assemble and should then be left standing.
-
Put a table against the window, not in front of it. The window should be to the side of the table, so light comes across the surface rather than straight along the camera axis.
-
Diffuse the window. Sheer curtain, diffusion panel, or parchment taped to the glass. If it is an overcast day you can skip this; clouds are already a diffuser the size of the sky.
-
Put your surface on the table. This matters more than people expect, because the surface fills most of the frame and it reflects light back up into the underside of the food. A matte mid-tone surface is the safe default; the full breakdown of what to use is in our guide to food photography backdrops.
-
Stand a white card on the far side of the dish. Foam board, a sheet of A3 card, or the white side of a 5-in-1 reflector. Slide it closer to lift the shadows, further away to deepen them. This single piece of card is the contrast control for the whole setup.
-
Add a black card if the dish is too flat. Pale food on a pale surface in soft light can lose all definition. A black card on the opposite side from the light subtracts rather than adds, carving an edge back into the subject.
-
Mark the camera position with tape. Same distance, same height, every dish. This is what makes a batch of forty photos look like a set.
The whole kit (diffusion, white card, black card, tape) costs less than one hour of a photographer’s time and will outlive several phones.
The best time of day to shoot by a window
Mid-morning or mid-afternoon on an overcast day is ideal, because the light is soft and it holds steady for hours. Direct midday sun through an undiffused window is the hardest light you will encounter indoors, and it moves: start a shoot at 11am in sunshine and your last photos will not match your first. If you only have a sunny window, diffuse it heavily and work fast.
LED lights for food photos: what the specs actually mean
Plenty of kitchens have no usable window, or the only shooting time is after close. A single LED panel solves it, and the buying decision comes down to three numbers.
CRI (colour rendering index). This is the one that matters most for food and the one cheap panels fail. CRI measures how accurately a light renders colour against a reference, and for photography you want 95 or above. Under a low-CRI light, reds go muddy, greens go grey and fresh produce looks days old, a problem no amount of editing fully reverses, because the colour information was never captured (Waveform Lighting, retrieved 2026-10-03).
Colour temperature. Around 5600K is daylight-balanced, which keeps food looking natural and lets you mix the panel with window light without a colour clash. Bi-colour panels that adjust between roughly 3200K and 5600K are convenient, but set one temperature and leave it for the whole session.
Size, not wattage. The softness of the light depends on how big the source is relative to the plate. A small, very bright panel is still a hard light. A larger panel, or a small one fired through a softbox or diffusion panel, is soft. If you are choosing between a brighter small light and a dimmer large one for food, take the large one.
Continuous LED beats flash for this work, and not marginally. With continuous light you see exactly what the camera will record, which means you can nudge the reflector and watch the shadow change. Strobes are more powerful and freeze motion better, which matters for pours and splashes and almost nothing else on a menu shoot. If you are photographing a liquid being poured, a strobe earns its place; otherwise the simplicity of continuous light wins.
Fixing the four most common food photography lighting problems
The food looks grey and lifeless. Almost always a colour temperature or CRI problem, or mixed sources. Turn off every light except one, set white balance against a white card, and if you are using a cheap LED, that is probably the culprit.
Harsh shadows cutting across the plate. The source is too small or too direct. Add diffusion between the light and the food, and move the light closer. Counterintuitively, moving a diffused light closer makes it relatively larger and therefore softer.
A bright blown-out patch on a sauce or glaze. Specular reflection, where a shiny surface mirrors the light straight back at the lens. Move the light more to the side or more behind, or change the camera angle a few degrees. A polarising filter removes it entirely if you are shooting with a real camera.
The photo is sharp in the middle and dark at the edges. Usually the window is too small relative to the scene, so the far side of the frame is in shadow. Shoot tighter, or add a reflector on the dark side.
Keeping the light the same across forty dishes
For a single hero shot, you can fuss over the light for an hour. For a menu shoot, consistency matters more than any individual frame, because customers see the photos as a grid.
Three habits do most of the work. Do not move anything between dishes: not the light, not the reflector, not the camera. Shoot the whole batch inside a window of a couple of hours so the daylight does not drift, or use the LED and ignore the time of day entirely. And apply one identical set of edits to the entire batch rather than correcting each photo to taste.
This is also the strongest argument for getting the light right in camera rather than planning to fix it later. Correcting exposure and colour across forty files that were all shot differently is slow and never quite lands; correcting forty files that were all shot the same way is one operation. Editing tools, including the AI relighting and background cleanup mentioned earlier, are far better at polishing a consistent set than at rescuing an inconsistent one.
Frequently asked questions about food photography lighting
What is the best light for food photography?
Large, soft, single-source, and coming from the side or slightly behind. In practice that means a diffused window during the day, or one large LED panel with CRI 95+ at about 5600K fired through a diffuser when there is no daylight. The specific brand matters far less than the size of the source and the accuracy of its colour.
Can I take good food photos with just my phone?
Yes, in good light. Phone sensors handle soft, even light well; what they handle badly is high contrast and low light, which is exactly what a kitchen ceiling produces. Turn the flash off permanently, move the dish to a window, and the phone stops being the limiting factor.
Should I use natural light or artificial light?
Natural light if you have a decent window and can shoot during daylight, because it is free, large and flattering. Artificial light if you shoot after close, if your space has no good window, or if you need every shoot to look identical regardless of weather. Many food businesses end up using both: daylight for the main session, an LED for the dish they added to the menu in November.
Why do my food photos look yellow or green?
Mixed light sources, low-CRI bulbs, or an auto white balance that guessed wrong. Fix it in that order: turn off everything except one light, replace cheap bulbs with a high-CRI panel, then set white balance manually using a white card in the first frame of the session.
Do I need a softbox?
Not if you have a window with a curtain over it. A softbox is just a way to make an artificial light bigger and softer, so it only becomes necessary once you are lighting with a bare LED or strobe. A diffusion panel on a stand does the same job for less money and is easier to move around.
Start with one window and one piece of card
The gap between a bad food photo and a good one is not equipment. It is a single diffused source placed to the side of the dish, a white card opposite it, and everything else in the room switched off. That setup costs almost nothing and handles the overwhelming majority of dishes a food business needs to photograph.
Build it once, mark the positions with tape, and leave it standing. The next time a new item goes on the menu, the shoot takes four minutes instead of an afternoon.